

EmDash 시작하기
이 가이드는 설치부터 첫 번째 게시물 발행까지, 첫 EmDash 사이트를 만드는 과정을 안내합니다.
EmDash가 적합한 Astro CMS인지 아직 평가 중이라면, EmDash란 무엇인가요? 또는 최고의 Astro CMS를 먼저 읽고 이 설정 가이드로 돌아오세요.
필수 조건
섹션 제목: “필수 조건”- Node.js v22.12.0 이상 (홀수 버전은 지원되지 않음)
- npm, pnpm, 또는 yarn
- 코드 편집기 (VS Code 권장)
새 프로젝트 생성
섹션 제목: “새 프로젝트 생성”npm create emdash@latestbashpnpm create emdash@latestbashyarn create emdash프롬프트에 따라 프로젝트 이름을 지정하고 환경 설정을 구성하세요.
개발 서버 시작
섹션 제목: “개발 서버 시작”-
프로젝트 디렉토리로 이동하세요:
Terminal window cd my-emdash-site -
의존성을 설치하세요:
Terminal window npm install -
개발 서버를 시작하세요:
Terminal window npm run dev -
브라우저에서 `http://localhost:4321“을(를) 열어주세요.
설정 마법사 완료
섹션 제목: “설정 마법사 완료”관리자 패널에 처음 접속하면, EmDash의 설정 마법사가 초기 구성을 안내합니다:
-
설정 마법사로 리디렉션됩니다. 다음을 입력하세요:
- 사이트 제목 — 사이트 이름
- 태그라인 — 간단한 설명
- 관리자 이메일 — 이메일 주소
-
사이트 생성을 클릭하여 패스키를 등록하세요
-
브라우저에서 Touch ID, Face ID, Windows Hello 또는 보안 키를 사용하여 패스키 생성을 요청합니다
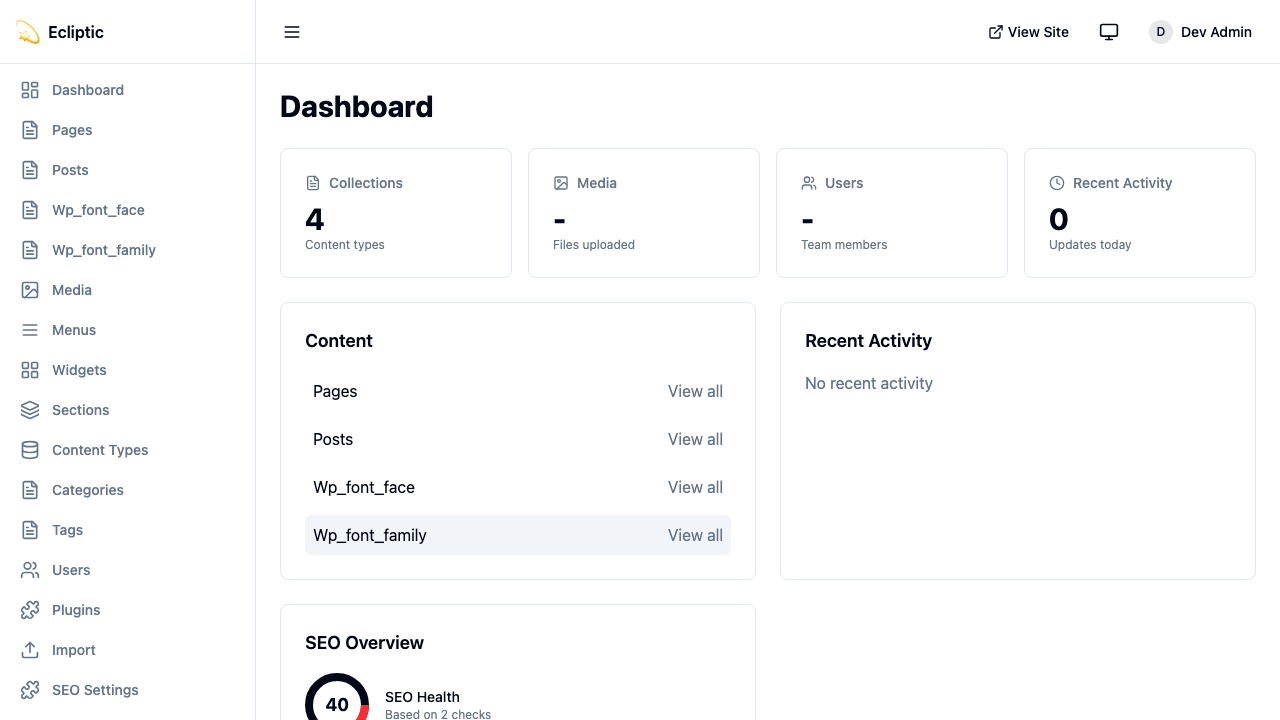
패스키가 등록되면 로그인되어 관리자 대시보드로 리디렉션됩니다.
첫 번째 게시물
섹션 제목: “첫 번째 게시물”-
관리자 사이드바에서 콘텐츠 아래의 게시물을 클릭하세요.
-
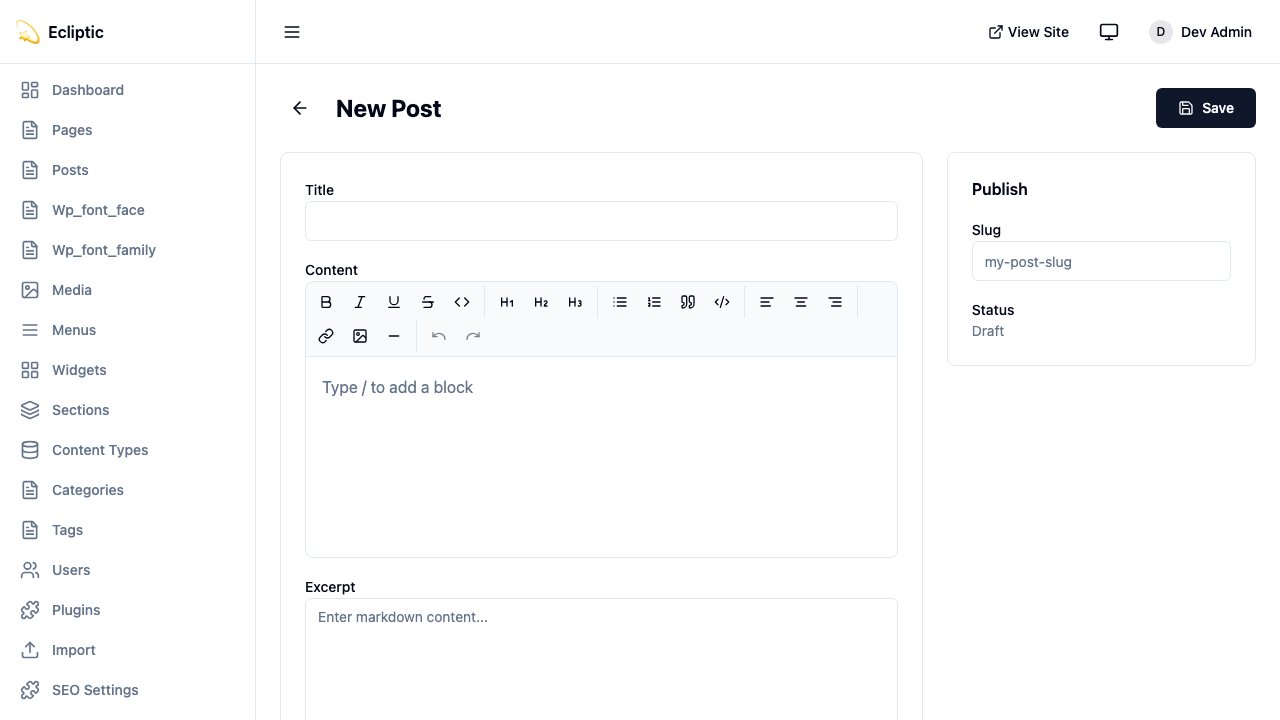
새 게시물을 클릭하세요.
-
제목을 입력하고 리치 텍스트 편집기를 사용하여 내용을 작성하세요.
-
상태를 발행됨으로 설정하고 저장을 클릭하세요.
-
사이트 홈페이지를 방문하여 게시물이 실시간으로 표시되는지 확인하세요 — 재빌드가 필요 없습니다!
프로젝트 구조
섹션 제목: “프로젝트 구조”EmDash 프로젝트는 몇 가지 추가 사항을 제외하면 표준 Astro 구조를 따릅니다:
my-emdash-site/├── astro.config.mjs # Astro + EmDash configuration├── src/│ ├── live.config.ts # Live Collections configuration│ ├── pages/│ │ ├── index.astro # Homepage│ │ └── posts/│ │ └── [...slug].astro # Dynamic post pages│ ├── layouts/│ │ └── Base.astro # Base layout│ └── components/ # Your Astro components├── .emdash/│ ├── seed.json # Template seed file│ └── types.ts # Generated TypeScript types└── package.json구성 파일
섹션 제목: “구성 파일”astro.config.mjs
섹션 제목: “astro.config.mjs”이 파일은 EmDash를 Astro 통합으로 구성합니다:
js title="astro.config.mjs"import { defineConfig } from "astro/config";import emdash, { local } from "emdash/astro";import { sqlite } from "emdash/db";
export default defineConfig({  integrations: [    emdash({      database: sqlite({ url: "file:./data.db" }),      storage: local({        directory: "./uploads",        baseUrl: "/_emdash/api/media/file",      }),    }),  ],});
src/live.config.ts
섹션 제목: “src/live.config.ts”이 파일은 EmDash를 Astro의 콘텐츠 시스템에 연결합니다:
ts title="src/live.config.ts"import { defineLiveCollection } from "astro:content";import { emdashLoader } from "emdash/runtime";
export const collections = { _emdash: defineLiveCollection({ loader: emdashLoader() }),};환경 변수
섹션 제목: “환경 변수”프로덕션 배포를 위해서는 다음을 설정해야 합니다:
# Required for authenticationEMDASH_AUTH_SECRET=your-secret-here
# 선택 사항: 콘텐츠 미리보기용EMDASH_PREVIEW_SECRET=your-preview-secret
안전한 인증 비밀을 생성하려면:
npx emdash auth secret페이지에서 콘텐츠 쿼리
섹션 제목: “페이지에서 콘텐츠 쿼리”Astro 페이지에서 EmDash의 쿼리 함수를 사용하세요. 이 함수들은 Astro의 라이브 컬렉션 패턴을 따르며, 컬렉션에는 { entries, error }을, 단일 항목에는 { entry, error }을 반환합니다:
astro title="src/pages/index.astro"---import { getEmDashCollection } from "emdash";import Base from "../../layouts/Base.astro";
const { entries: posts } = await getEmDashCollection("posts");---
<Base title="홈">  <h1>최신 게시물</h1>  <ul>    {posts.map((post) => (      <li>        <a href={`/posts/${post.slug}`}>{post.data.title}</a>      </li>    ))}  </ul></Base>
단일 항목의 경우:
astro title="src/pages/posts/[slug].astro"---import { getEmDashEntry } from "emdash";
const { slug } = Astro.params;const { entry: post } = await getEmDashEntry("posts", slug);
if (!post) {  return Astro.redirect("/404");}---
<h1>{post.data.title}</h1>
TypeScript 타입 생성
섹션 제목: “TypeScript 타입 생성”완전한 타입 안전성을 위해 데이터베이스 스키마에서 타입을 생성하세요:
npx emdash types이 명령은 모든 컬렉션에 대한 인터페이스가 포함된 .emdash/types.ts를 생성합니다. 이제 편집기에서 필드 이름 자동 완성 및 타입 오류 감지가 가능해집니다.
다음 단계
섹션 제목: “다음 단계”이제 작동하는 EmDash 사이트가 준비되었습니다! 다음으로 이동할 곳은 다음과 같습니다:
- 핵심 개념 — EmDash의 내부 작동 방식 이해하기
- 콘텐츠 작업하기 — 콘텐츠 쿼리 및 렌더링 방법 배우기
- 미디어 라이브러리 — 이미지 및 파일 업로드 및 관리하기
- 블로그 만들기 — 카테고리와 태그가 포함된 완전한 블로그 구축하기
- Cloudflare에 배포하기 — 사이트를 프로덕션 환경으로 전환하기