

블로그 만들기
이 가이드는 콘텐츠 유형 정의부터 카테고리와 태그가 포함된 게시물 표시까지, EmDash로 블로그를 만드는 과정을 안내합니다.
사전 요구사항
섹션 제목: “사전 요구사항”- 설정 및 실행 중인 EmDash 사이트 (시작하기 참조)
- Astro 컴포넌트에 대한 기본적인 이해
게시물 컬렉션 정의
섹션 제목: “게시물 컬렉션 정의”EmDash는 설정 중에 기본 “posts” 컬렉션을 생성합니다. 사용자 정의가 필요한 경우 관리자 대시보드나 API를 사용하세요.
기본 posts 컬렉션에는 다음이 포함됩니다:
title- 게시물 제목slug- URL 친화적인 식별자content- 리치 텍스트 본문excerpt- 짧은 설명featured_image- 헤더 이미지 (선택 사항)status- 초안, 게시됨, 예약됨publishedAt- 게시 날짜 (시스템 필드)
첫 번째 게시물 작성
섹션 제목: “첫 번째 게시물 작성”-
관리자 대시보드
/_emdash/admin열기 -
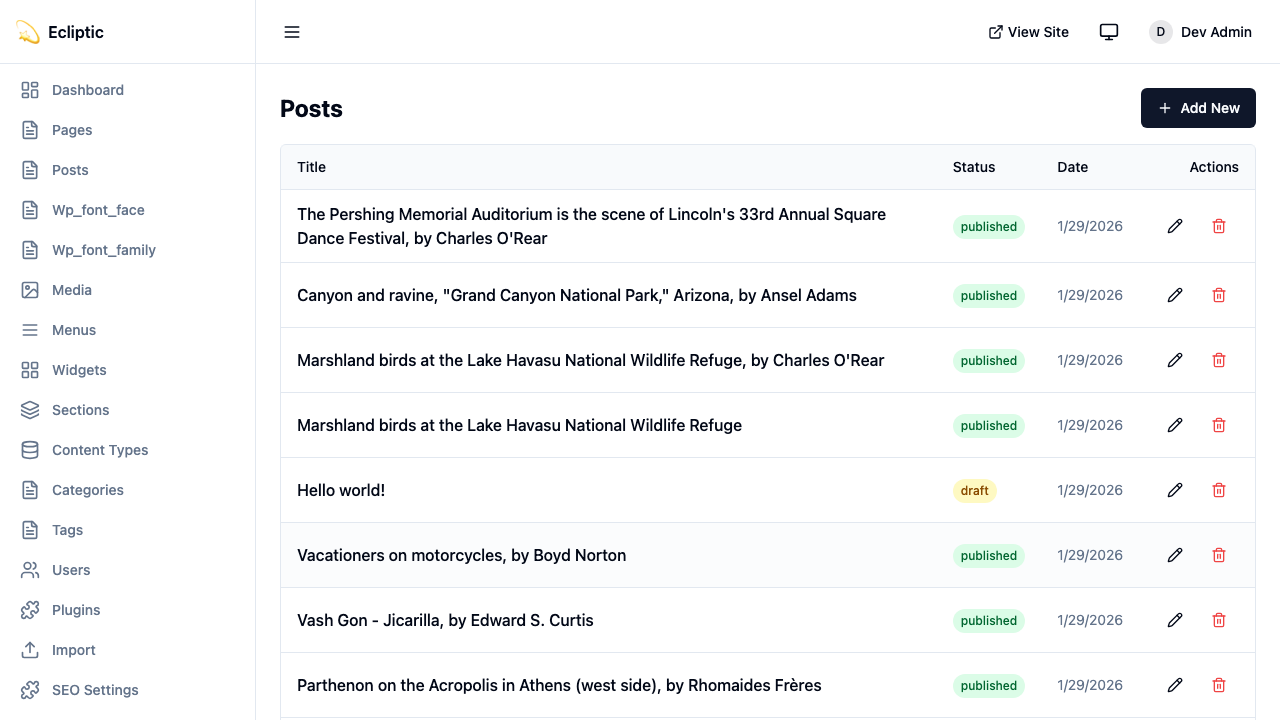
사이드바에서 Posts 클릭
-
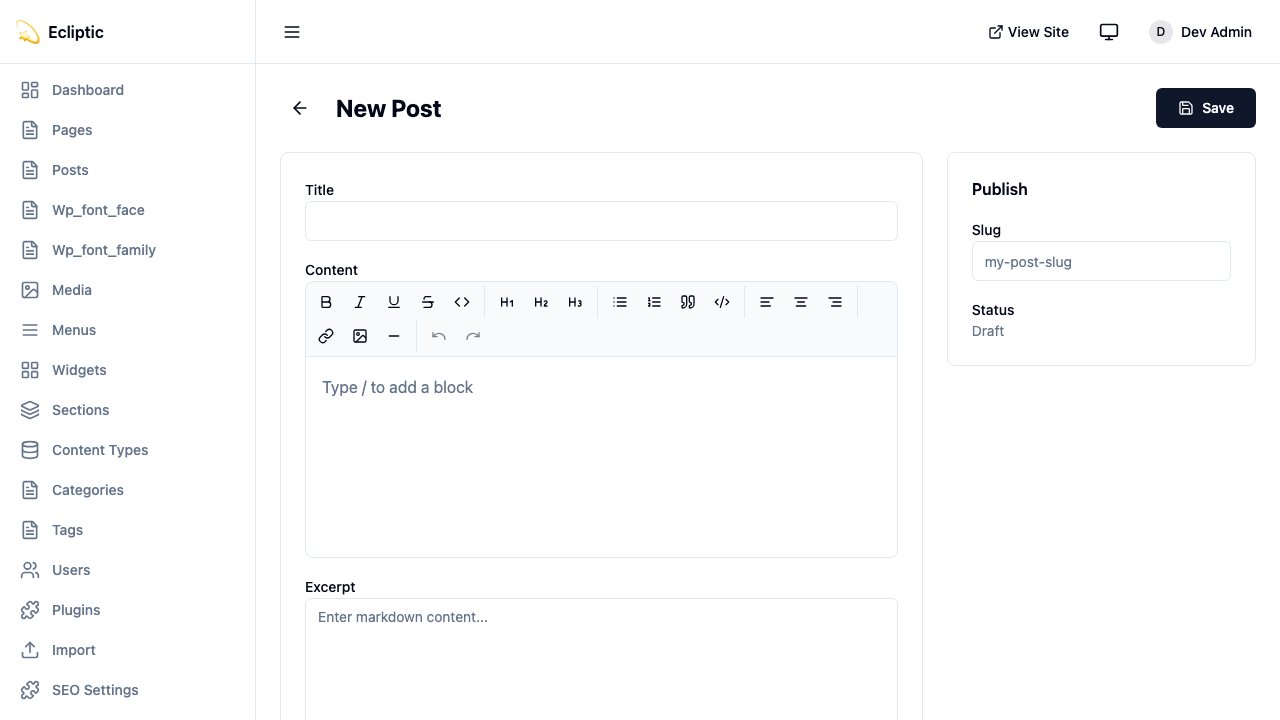
New Post 클릭
-
제목을 입력하고 리치 텍스트 편집기를 사용하여 콘텐츠 작성
-
사이드바 패널에서 카테고리와 태그 추가
-
상태를 Published로 설정
-
Save 클릭
게시물이 이제 라이브 상태입니다. 재빌드가 필요하지 않습니다.
사이트에 게시물 표시
섹션 제목: “사이트에 게시물 표시”모든 게시물 나열
섹션 제목: “모든 게시물 나열”게시된 모든 게시물을 표시하는 페이지 생성:
---import { getEmDashCollection } from "emdash";import Base from "../../../layouts/Base.astro";
const { entries: posts } = await getEmDashCollection("posts", {  status: "published",});
// 게시 날짜 기준으로 정렬, 최신순const sortedPosts = posts.sort(  (a, b) => (b.data.publishedAt?.getTime() ?? 0) - (a.data.publishedAt?.getTime() ?? 0));---
<Base title="Blog">  <h1>Blog</h1>  <ul>    {sortedPosts.map((post) => (      <li>        <a href={`/blog/${post.data.slug}`}>          <h2>{post.data.title}</h2>          <p>{post.data.excerpt}</p>          <time datetime={post.data.publishedAt?.toISOString()}>            {post.data.publishedAt?.toLocaleDateString()}          </time>        </a>      </li>    ))}  </ul></Base>
단일 게시물 표시
섹션 제목: “단일 게시물 표시”개별 게시물을 위한 동적 경로 생성:
astro title="src/pages/blog/[slug].astro"---import { getEmDashCollection, getEmDashEntry } from "emdash";import { PortableText } from "emdash/ui";import Base from "../../../layouts/Base.astro";
export async function getStaticPaths() {  const { entries: posts } = await getEmDashCollection("posts", {    status: "published",  });
  return posts.map((post) => ({    params: { slug: post.data.slug },  }));}
const { slug } = Astro.params;const { entry: post } = await getEmDashEntry("posts", slug);
if (!post) {  return Astro.redirect("/404");}---
<Base title={post.data.title}> <article> {post.data.featured_image && ( <img src={post.data.featured_image} alt="" /> )} <h1>{post.data.title}</h1> <time datetime={post.data.publishedAt?.toISOString()}> {post.data.publishedAt?.toLocaleDateString()} </time> <PortableText value={post.data.content} /> </article></Base>카테고리 및 태그 추가
섹션 제목: “카테고리 및 태그 추가”EmDash에는 내장된 카테고리 및 태그 분류 체계가 포함되어 있습니다. 용어 생성 및 관리에 대한 자세한 내용은 분류 체계를 참조하세요.
카테고리별 게시물 필터링
섹션 제목: “카테고리별 게시물 필터링”astro title="src/pages/category/[slug].astro"---import { getEmDashCollection, getTerm, getTaxonomyTerms } from "emdash";import Base from "../../../layouts/Base.astro";
export async function getStaticPaths() { const categories = await getTaxonomyTerms("category");
// 계층적 카테고리 평면화 const flatten = (terms) => terms.flatMap((t) => [t, ...flatten(t.children)]);
return flatten(categories).map((cat) => ({ params: { slug: cat.slug }, props: { category: cat }, }));}
const { category } = Astro.props;
const { entries: posts } = await getEmDashCollection("posts", { status: "published", where: { category: category.slug },});---
<Base title={category.label}> <h1>{category.label}</h1> {category.description && <p>{category.description}</p>}
<ul> {posts.map((post) => ( <li> <a href={`/blog/${post.data.slug}`}>{post.data.title}</a> </li> ))} </ul></Base>게시물 카테고리 표시
섹션 제목: “게시물 카테고리 표시”개별 게시물에 카테고리 표시:
astro title="src/components/PostMeta.astro"---import { getEntryTerms } from "emdash";
interface Props {  postId: string;}
const { postId } = Astro.props;const categories = await getEntryTerms("posts", postId, "category");const tags = await getEntryTerms("posts", postId, "tag");---
<div class="post-meta">  {categories.length > 0 && (    <div class="categories">      <span>Categories:</span>      {categories.map((cat) => (        <a href={`/category/${cat.slug}`}>{cat.label}</a>      ))}    </div>  )}
  {tags.length > 0 && (    <div class="tags">      <span>Tags:</span>      {tags.map((tag) => (        <a href={`/tag/${tag.slug}`}>{tag.label}</a>      ))}    </div>  )}</div>
페이지네이션 추가
섹션 제목: “페이지네이션 추가”많은 게시물이 있는 블로그의 경우 페이지네이션 추가:
astro title="src/pages/blog/page/[page].astro"---import { getEmDashCollection } from "emdash";import Base from "../../../../layouts/Base.astro";
const POSTS_PER_PAGE = 10;
export async function getStaticPaths() {  const { entries: allPosts } = await getEmDashCollection("posts", {    status: "published",  });
  const totalPages = Math.ceil(allPosts.length / POSTS_PER_PAGE);
  return Array.from({ length: totalPages }, (_, i) => ({    params: { page: String(i + 1) },    props: { currentPage: i + 1, totalPages },  }));}
const { currentPage, totalPages } = Astro.props;
const { entries: allPosts } = await getEmDashCollection("posts", {  status: "published",});
const sortedPosts = allPosts.sort(  (a, b) => (b.data.publishedAt?.getTime() ?? 0) - (a.data.publishedAt?.getTime() ?? 0));
const start = (currentPage - 1) * POSTS_PER_PAGE;const posts = sortedPosts.slice(start, start + POSTS_PER_PAGE);---
<Base title={`Blog - Page ${currentPage}`}>  <h1>Blog</h1>
  <ul>    {posts.map((post) => (      <li>        <a href={`/blog/${post.data.slug}`}>{post.data.title}</a>      </li>    ))}  </ul>
  <nav>    {currentPage > 1 && (      <a href={`/blog/page/${currentPage - 1}`}>Previous</a>    )}    <span>Page {currentPage} of {totalPages}</span>    {currentPage < totalPages && (      <a href={`/blog/page/${currentPage + 1}`}>Next</a>    )}  </nav></Base>
RSS 피드 추가
섹션 제목: “RSS 피드 추가”블로그를 위한 RSS 피드 생성:
ts title="src/pages/rss.xml.ts"import rss from "@astrojs/rss";import { getEmDashCollection } from "emdash";
export async function GET(context) {  const { entries: posts } = await getEmDashCollection("posts", {    status: "published",  });
  return rss({      title: "내 블로그",      description: "EmDash로 만든 블로그",    site: context.site,    items: posts.map((post) => ({      title: post.data.title,      pubDate: post.data.publishedAt,      description: post.data.excerpt,      link: `/blog/${post.data.slug}`,    })),  });}
아직 설치하지 않았다면 RSS 패키지 설치:
npm install @astrojs/rss